
The 3 Must Follow Rules For A Proper Install


1
Never cut any wires with the lights powered. The lights are powered anytime they are plugged into a power source, whether the lights are on or not. Always install with the lights unplugged from all power sources.
2
Connect like to like wires. The wire labeled “EverLights” only connects to other wires labeled “EverLights”. Same deal for the other three wires.
3
Keep the direction of the lights constant. Every light has an input and output. They must always connect in to out. There is an arrow on the back of every light and on the front of every data buffer. Ensure all arrows are pointing in the same direction.
Failure to follow rules above will result in an increased failure rate because of improper power flow.

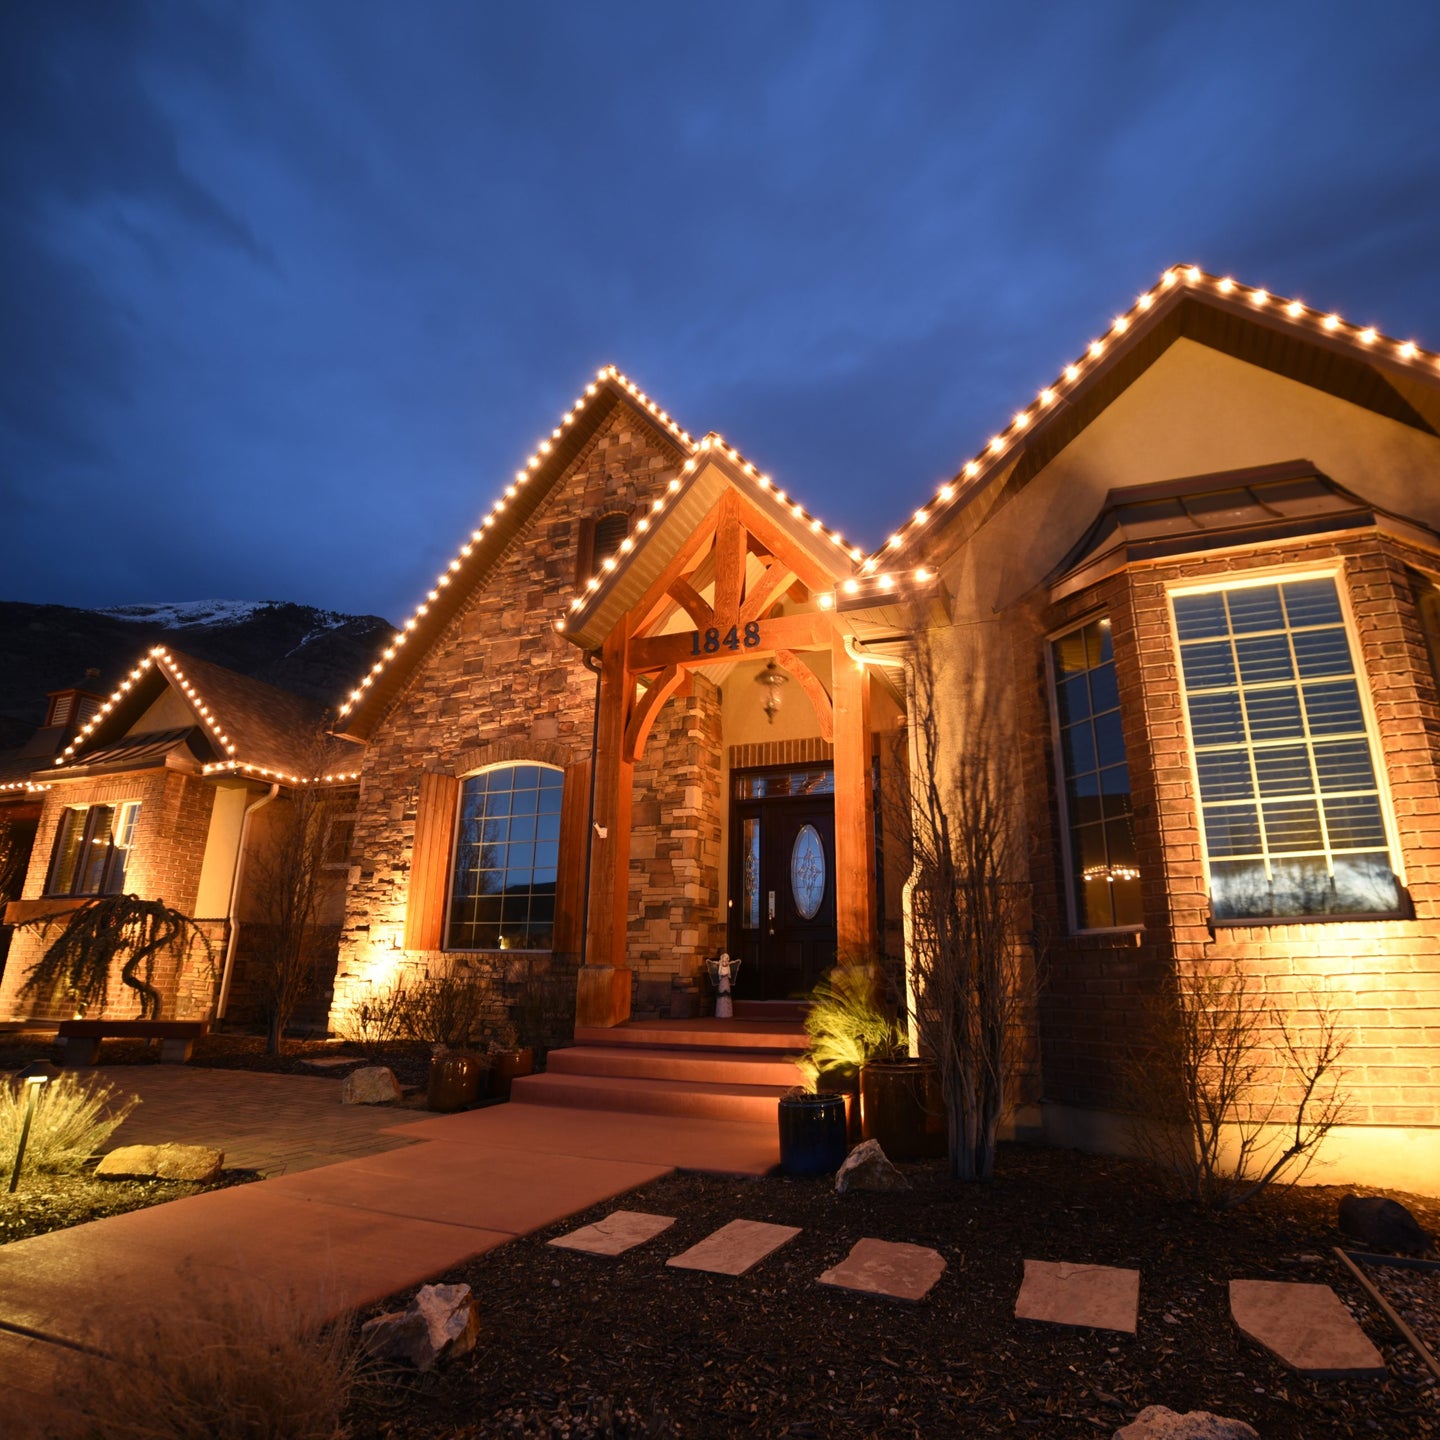
Permanent Christmas Light Installation
When it comes to simple Christmas light installation, homeowners turn to EverLights. Our patented design means EverLights are the easiest permanent holiday lights to install. Whether you’re an experienced tradesman or a weekend warrior, we’ll walk you through the system and installation procedure with the following guide.
Now You're Ready To Get Creative
Every Season. Every Color. Order Your EverLights Today!
Installation Instructions
Network Bridge and Wireless Receiver Setup
EverLights Bridge Setup Video
With the Bridge connected, you now need to pair any wireless receivers you have. Make sure to follow this step in close proximity to the Bridge to ensure a simple connection. Do not install the wireless receiver outside before pairing with the Bridge. To put the bridge in pairing mode, press the black button on the back of the bridge. This will put the bridge in pairing mode for two minutes.
To put the wireless receiver in pairing mode, use the included wire-nuts to attach a power supply and plug the wireless receiver into an outlet. Like pressing the pairing button on the Bridge, plugging the wireless receiver into power will put it into pairing mode for two minutes. It does not matter what order you do this in, it only matters that both units are in pairing mode at the same time. Now go into the EverLights app and navigate to Menu/Settings/Zones and click the plus icon in the bottom left corner. Follow the instructions on the screen to pair your zones.
Wireless Receiver Installation
The Wireless Receiver connects directly to the lights and tells them what to do by receiving a low frequency radio signal from the bridge at distances up to half a mile. It is always best to install the wireless receiver on one end of the house or another. If you install the wireless receiver with lights on both sides of it, any patterns and animations will not look their best as they will converge or diverge from that point.
In the ideal situation, an eave outlet or other power source will be available on one end of the house. If no power is readily available, the garage is typically the best location for the wireless receiver. Wherever you are able to install the wireless receiver, make sure it is connected directly to the power supply with two of the included pink butt splice connectors.
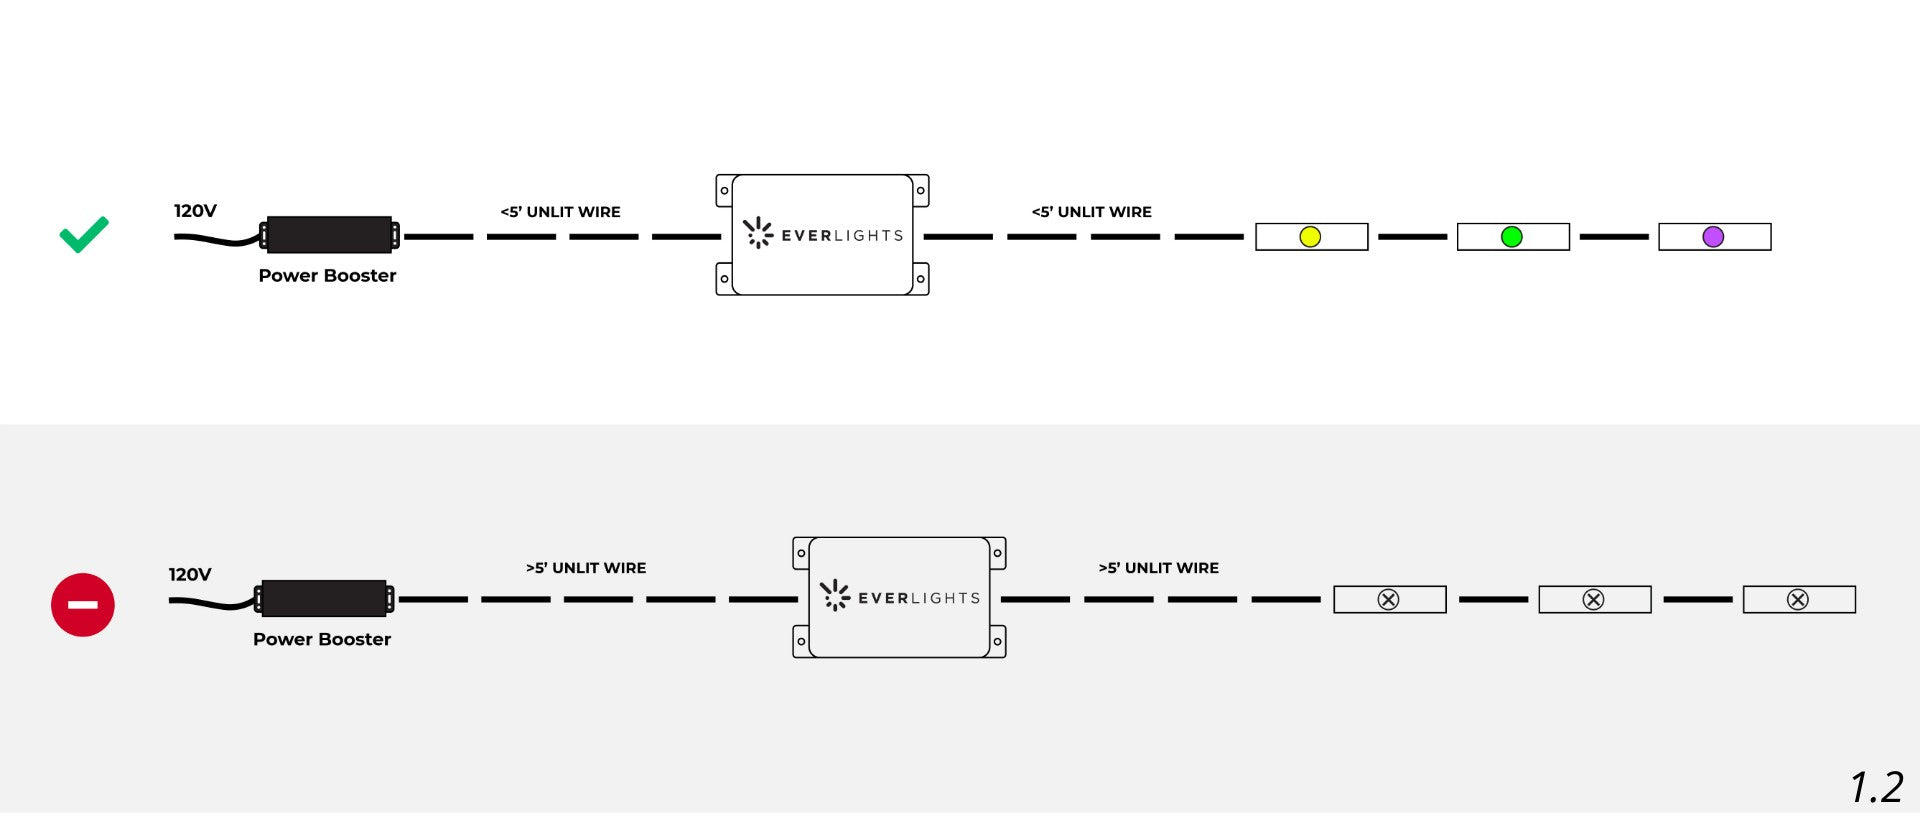
If power is not where you want the receiver to be, do not insert additional wire between the power supply and wireless receiver, otherwise it will run the risk of not working properly. Instead, connect the wireless receiver directly next to the power supply, attach a data buffer to the output wires of the wireless receiver, and run unlit wire to where your lights start.
A data buffer is important to send a strong data signal and will be discussed in depth below. If the length of wire between the wireless receiver and first light is less than five feet, there is no need for a data buffer. Make sure the wireless receiver is installed in a dry location as it is splash resistant but not waterproof. Also ensure the wire connecting the lights to the wireless receiver has a drip loop to prevent water from running down the line and directly into the wireless receiver.
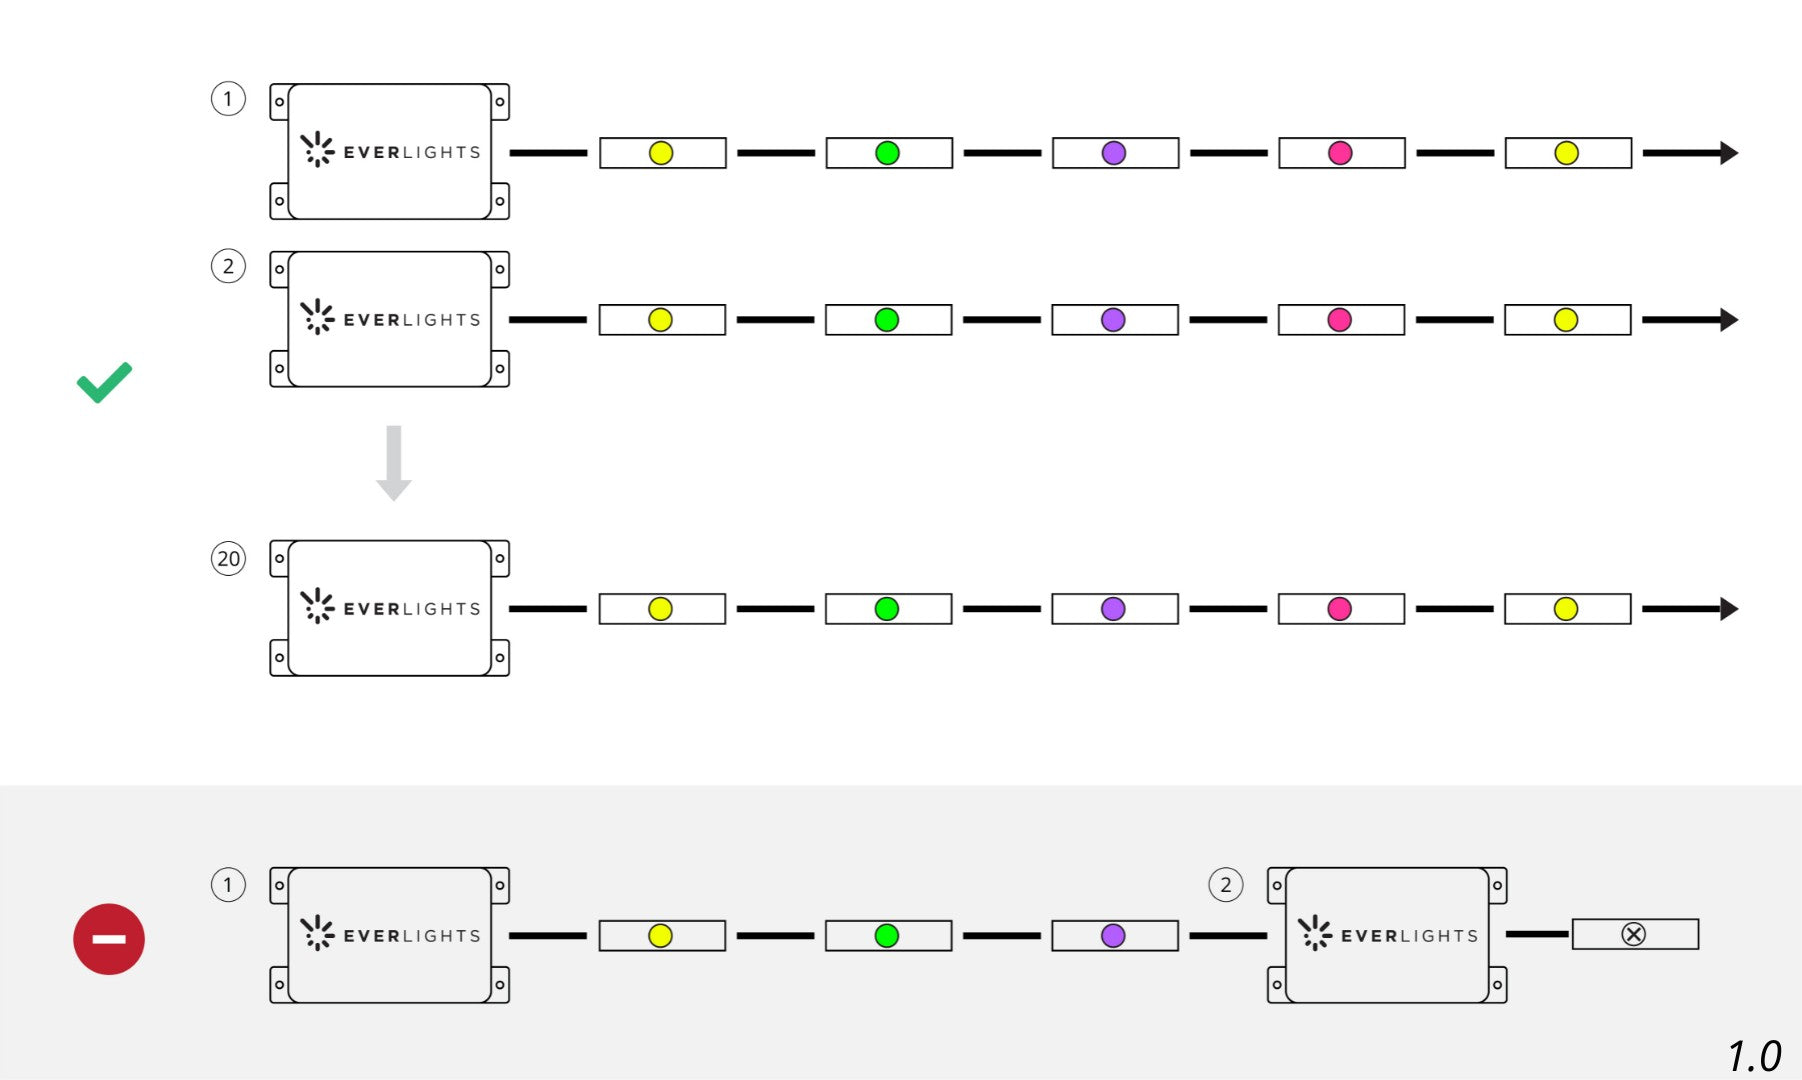
Up to 20 wireless receivers can be paired to a single EverLights Bridge, however they should never be wired into the same strand of lights.
Wiring and System Basics
EverLights Connection Video
Color Changing EverLights are directional and all arrows must be pointing in the same direction away from the wireless receiver. Each light has an arrow printed on the backside of the shell. Likewise, data buffers have an arrow label attached to the wiring.
EverLights utilize a 4-wire cable. Each wire is uniquely labeled to designate what it’s for:
EverLights = +5v positive wire
Solid White Line = Main data line
Solid Black Wire = Backup data line
GND = Ground wire
Wire designations can always be double checked with the labeling on the PCB. At connection points, always attach like to like wires.
Pro Tip: before crimping any wires together, always double check you are connecting the correct wires. Incorrect connections can be very frustrating to locate and fix later, it is much better to spend the extra time double checking wires before moving on than to come back later. For an extra layer of confidence, trace any cut wires back to the shell and verify the EverLights wire is connected to the +5v portion of the PCB.
EverLights can be cut and customized at any point, as long as the power is unplugged. Simply having the lights turned off in the app is not sufficient, they must be completely powered down. With power disconnected, cut and splice at any point to tailor the lights to your unique roofline.
Y-splits can be inserted at any point to carry the lights on in two directions. Any leg coming out of the Y-split with a section of unlit wire greater than 5 feet must have a data buffer inserted directly into the Y-split preceding the unlit wire to ensure a strong enough signal passes through.
Power Boosters
EverLights Power Booster Installation
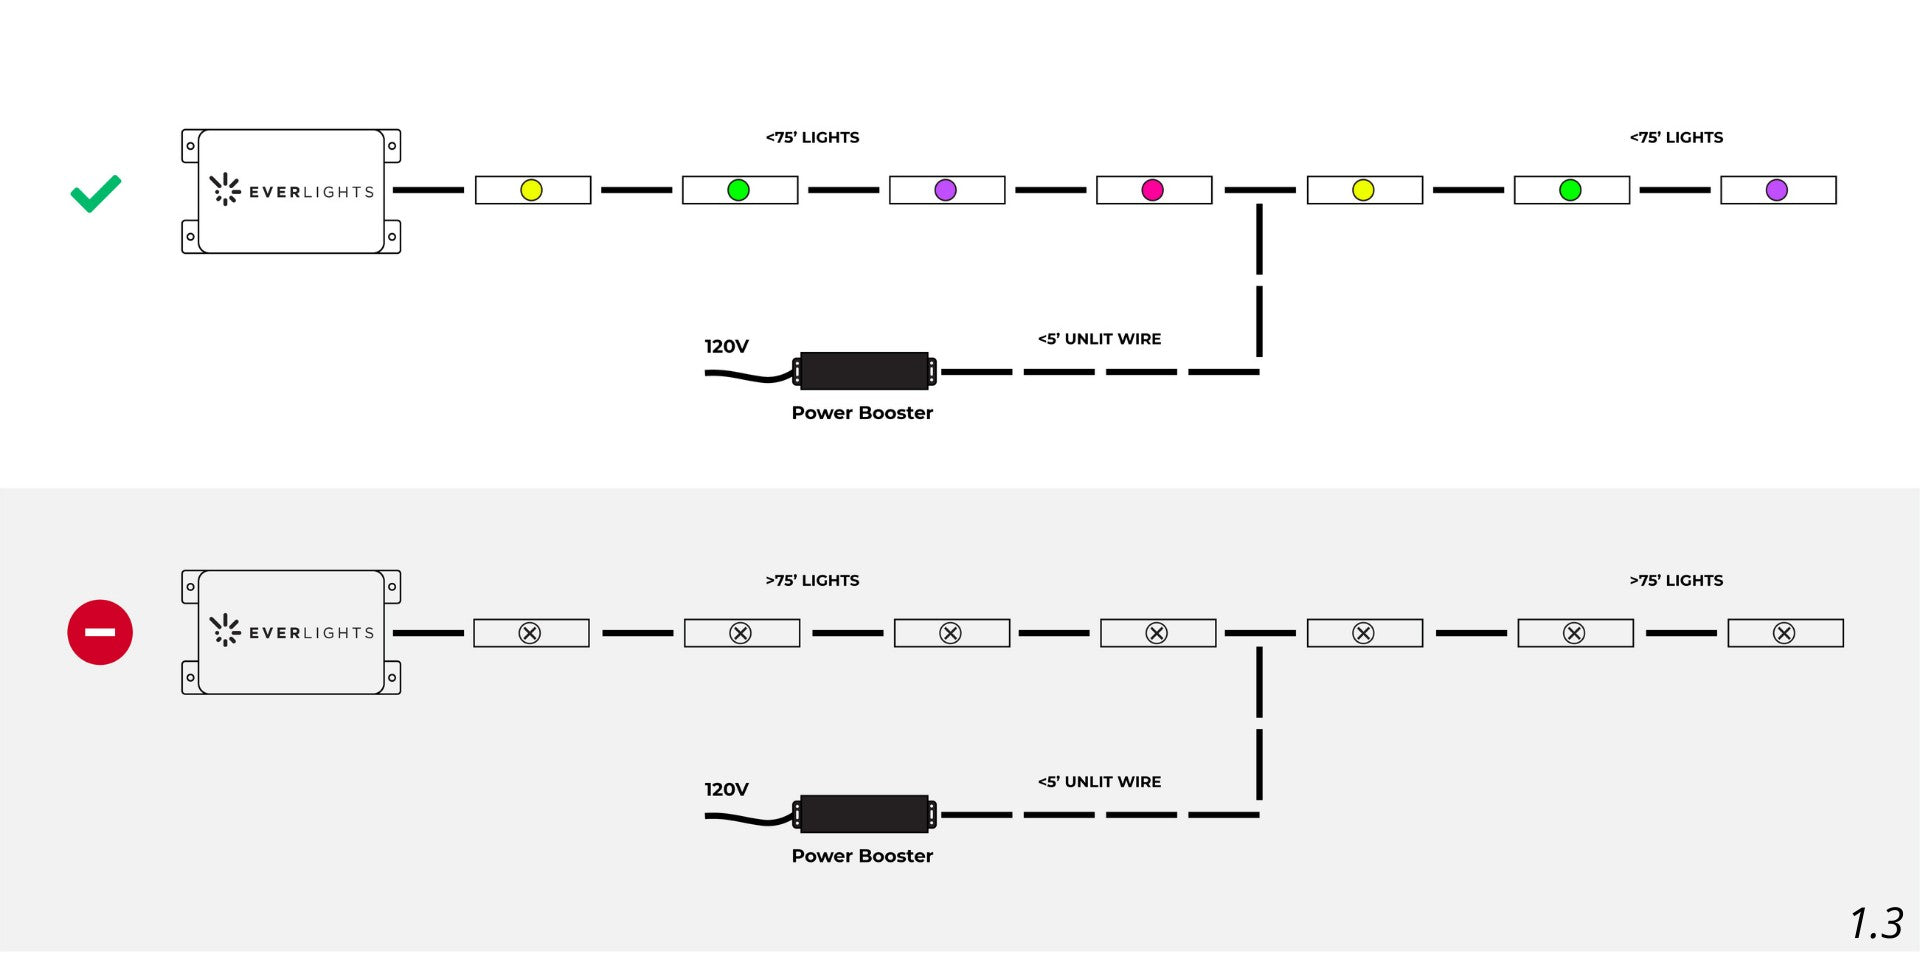
Color Changing EverLights are a 5 volt system. As lights draw on the initial power supply, the system needs to receive additional power to keep consistent color and brightness across the lights. There’s no perfect calculation as every roofline is different, but as a general rule of thumb a power booster is required every 75 feet. However, power is not directional so if you have a power supply at the beginning and end of 125 foot run, the load on each supply would be less than 75 feet and the lights would still have sufficient power.
Each Power Booster is only good for 75 total feet of lights though, so don’t expect to put a booster in the middle of a run of lights and get 75 feet in both directions. If a power source for a booster is not close to where the booster is tied in, you can extend the wire on the output end of the booster to get to the location power is needed. Avoid this strategy whenever possible as the unlit wire will provide resistance and result in a weaker boost where it ties in. For example, extending 50 feet of wire on the output end of the booster will effectively result in a negligible boost.
Data Buffers
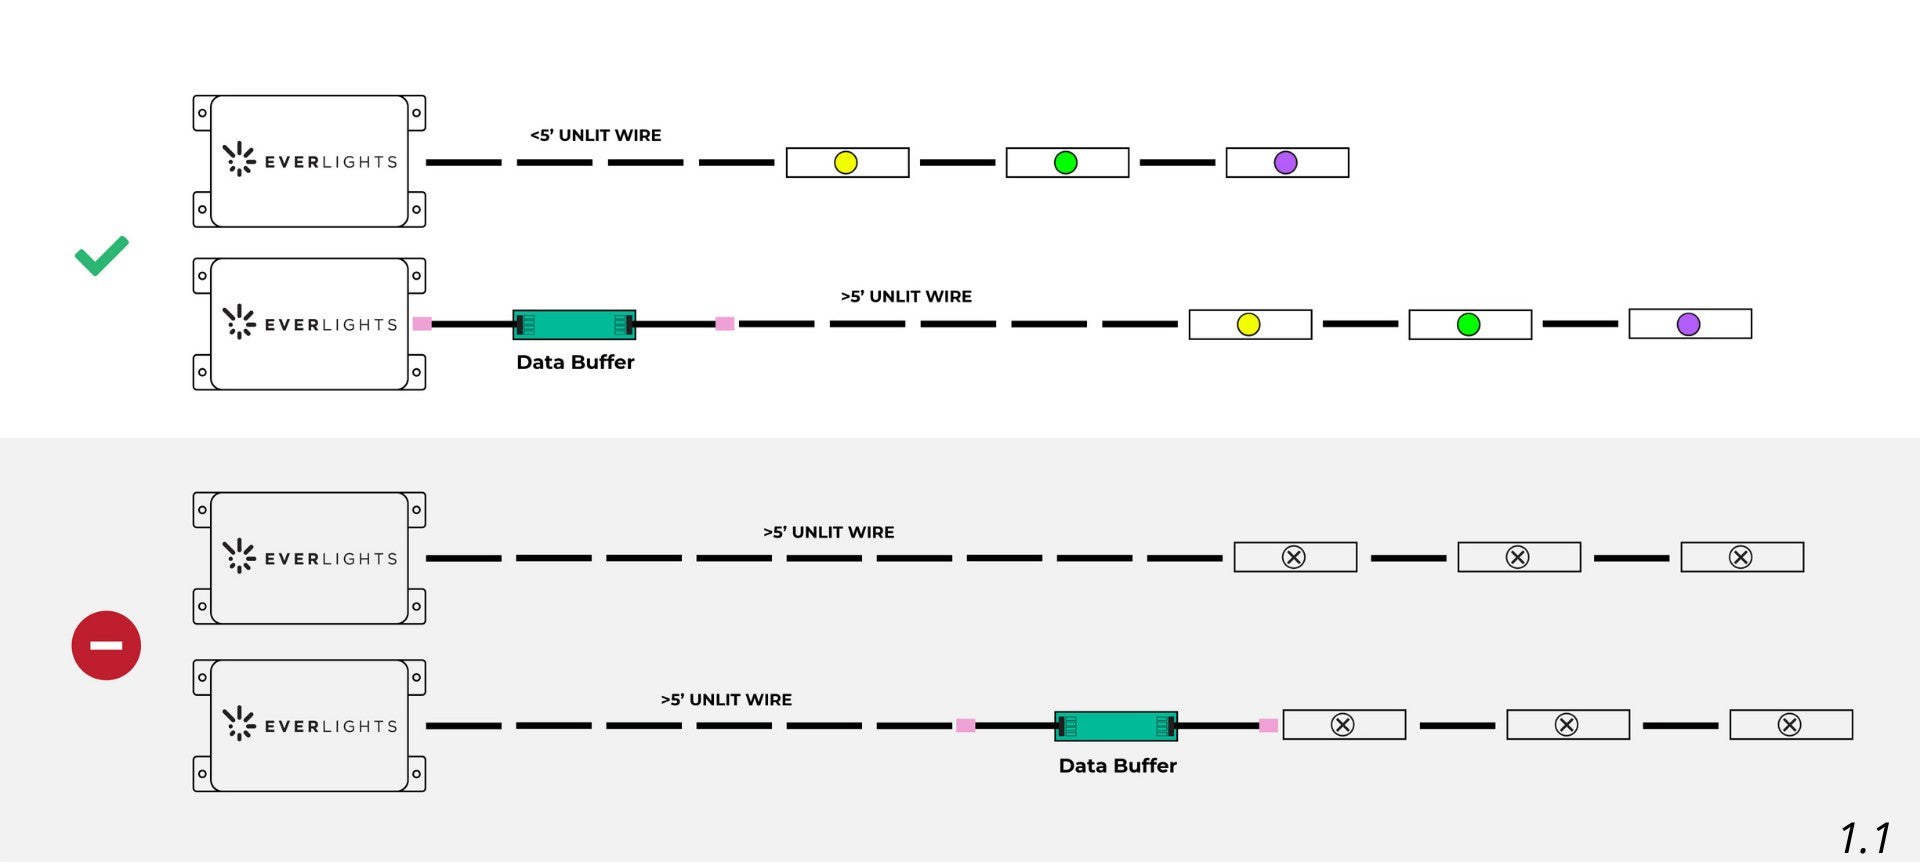
Every light receives the data signal, takes the information it needs, then sends a signal to the next light. While each light can send a reliable signal at short distances, a data buffer must be inserted before longer jumps of wire to send a strong signal. As a rule of thumb, any section of unlit wire greater than five feet needs a data buffer installed before the jump.
This data buffer will take the weak signal from the light before and send out a strong signal capable of going up to 50 feet. This rule applies to the data signal coming out of the wireless receiver as well. It’s very rare and should be avoided whenever possible, but if a jump of more than 50 feet is ever required, you must insert a data buffer before the long jump, as well as a second data buffer in the middle of that jump wire with neither end exceeding 50 feet. A data buffer will also be required directly after every Y-split that leads to any length of unlit wire
Installing Lights
Full Installation Animation Video
In Gutters: EverLights are designed to fit into the top attachment lip of gutters. Simply roll out the included layout tape and drill through the bullseyes to position your lights perfectly. It’s a good idea to roll out as much tape as you can safely reach in each position to look for any obstacles ahead. If the gutters are attached with gutter hangers you can generally move the clips without too much difficulty using a ¼” hex bit whenever there’s a conflict. However, when gutters are attached with gutter nails you never want to come within an inch of a nail or try to move one. Instead, roll out as much tape as possible to plan ahead for obstacles. It’s OK to cheat the lights closer together, but never further apart.
Generally cheating the lights ½” closer together will not be noticeable, but you want to avoid ever cheating lights inches closer together (doing this will catch you eye when the lights are on). Also try and keep spacing consistent around any corners. Depending on the type of gutter, the return lip on the inside of the gutter may be too tight to fit the shell of the light into. In this scenario, take some pliers or sheet metal seamers to pinch that lip tight on the backside to allow the shell of the light to fit into the gutter lip. When pinching this lip be careful not to pull up and out, otherwise you may end up with visible waves in the top lip of the gutter around each light.
In Drip edge: Depending on geographical area and builder preference, you may already have a suitable installation material on your eaves in the drip edge flashing. If the drip edge is roughly an inch and a half tall or greater and pliable, you should be good to go. Otherwise, you will want to grab some channel to put the lights in. When suitable drip edge is present, use the layout tape just like on gutters, drill a hole, and insert the light through the backside.
For best results, start the layout from the top of the peak, 4 inches down on each side. This will make all peaks on the home match and give the most polished result. It is possible to put a light directly at each peak, though it is always much more work and typically does not look near as clean during the day. This is why we recommend consistently starting 4 inches down from the peak on each side.
Drip Edge Installation Video
In Channel: If gutters and drip edge are not present, or you simply prefer the channel approach, there are multiple mounting options available using the two profiles available in our shop. Installation concepts are very similar as explained above. For the smoothest installation process, install one piece at a time. Start by putting the lights into the channel with the exception of the last light in the segment.
The next channel piece will overlap at this light, so it works best to leave the overlapping light out initially. Mount the channel with a screw every few feet. Once the first channel piece is up, insert the lights into the second piece of channel with the exception of the first and last light. Next use the overlapping light to connect the two pieces of channel and secure to the building with a screw. When using channel at a peak, be sure to start the layout four inches down each side as with drip edge installation described above.
Channel Peak Installation Video
Terminating wire runs
Wherever you decide to terminate a run of lights it is very important to properly protect the exposed wires. There are multiple methods to coat the end of the wires, but generally electrical tape, silicone, or liquid electrical tape work best. The purpose of coating the wires is to prevent the positive and wires from coming in contact through water, touching against a piece of metal, or any other conductive material.
A short in the lights will cause improper function and potential damage to the lights in the system. To further protect against a potential short, snip the positive wire an inch shorter than the other wires before coating.
General FAQ
Can I use EverLights year round?
Absolutely! We have customers using our lights for birthdays, family gatherings, game nights, welcome home, and parties of all kinds. With our endless color options you can make any event special. Get a quote now!
Can I set timers & events?
Yes! You can easily create calendar events in our EverLights app.
Can I do warm / soft white?
Yes! You can create almost any color using the color wheel. You can color match the warmth of your existing exterior lighting. Check them out!
What is your return policy?
Unused material can be returned but is subject to a restocking fee of 20%. This fee covers all testing and repackaging required for us to certify the product is good as new. Un-used lengths of lights must be in 25 foot increments to be eligible for return.
How do you ship your product?
Orders received by 3:00 PM MST generally go out same day with channel orders requiring additional lead time depending on current demand. We offer USPS Priority shipping and UPS Ground.
Where are orders shipped from?
Orders are boxed up and shipped out of our headquarters in Lindon, UT.
Where are the controller and power supplies installed?
Our network bridge plugs directly into an Ethernet port on your router. Power supplies are installed along the eaves at every 75ft of lights There is a small network bridge that plugs directly into an Ethernet port on your router. A small wireless receiver will be placed either in the garage or on the side of the garage to power and control your lights. You may need additional power boosters installed as well.
How much do EverLights cost?
All home comes in different sizes & depending on the linear footage of your roofline and the complexity of the install will start around $2000. Fill out the short form for a free estimate.
How long do EverLights last?
EverLights are rated for 50k hours of lighting! Which is equivalent to leaving them on for 24/7 - seven years straight
How many colors can EverLights do at a time?
EverLights is the most customizable system available, allowing users to design custom sequences of up to 250 unique color/brightness combinations at a time. In many cases this will allow the user to tell each individual light on the house what to do.
Are EverLights dimmable?
Yes! There is a dimming switch on the app
How do I replace a part or get more parts?
EverLights can be cut and customized at any point as long as the power is unplugged. Lights and accessories can be found in our online shop. View or troubleshooting guide and installation instructions for step by step instructions on all system components.