
EverLights designed ClickLights so homeowners could install permanent outdoor lighting themselves without hiring an electrician. The system follows a three-step process: choose your configuration, measure your roofline, and install the kit. Most homeowners finish in one to two days depending on roofline size and complexity.
This guide walks through each step and where first-time installers tend to run into questions.
Step 1: Choose Your ClickLights Configuration
Before ordering, you need to decide between two things: your lighting type and your mounting direction.
Lighting type. ClickLights come in two configurations. The color-changing option uses RGBW pixels that produce over 4 billion color combinations, including a dedicated white channel for clean warm white output. The Classic White configuration produces warm white only.
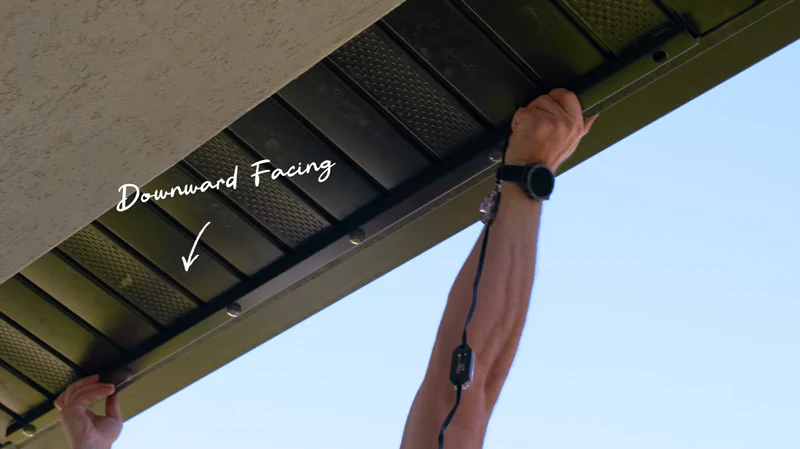
Mounting direction. ClickLights can face outward or downward. Outward facing projects light away from the house, which is the more common choice for holiday displays and street-facing accent lighting. Downward facing washes light down the exterior walls, which works better for soffit-mounted setups.
Channel. The aluminum mounting channel is purchased separately because every roofline is a different length. EverLights offers channels in 25 color options to match your existing trim, and it protects the wiring from UV exposure.
Step 2: Measure Your Roofline
Getting your measurement right is the most important part of ordering. ClickLights pixels are spaced at 9-inch intervals, so your roofline length determines how many pixels and how much channel you need.
What to measure. Measure the total linear footage of every roofline section where you want lights, including peaks, valleys, and architectural features. Don’t round down. Better to have extra material than come up short mid-installation.
How to measure. EverLights provides a video walkthrough on their DIY page that shows how to measure your roofline using Google Earth’s ruler tool. Draw lines corner to corner along each section and add roughly five extra feet per peak to account for the angle. For multi-story or complex rooflines where the satellite view isn’t clear enough, a measuring wheel on-site works as a backup.
Ordering. ClickLights bundles come in pre-set lengths. Each kit includes LED strands, a 24V power supply, network bridge, wireless receiver, butt splice heat shrinks, and 50 feet of 3-wire. Channel is ordered separately based on your measurement.
Step 3: Install the System
The installation process is physical but not technical. You don’t need electrical contractor experience, but you’ll need more than a basic toolbox. Based on the EverLights installation walkthrough, plan on having a drill or driver, wire strippers, electrical tape, a heat gun (for shrink tubing on connections), a ladder, and zip ties or cable clips for routing wire.
Mount the Channel
Attach the aluminum channel along your roofline. It mounts to fascia boards, under drip edge, or along gutters depending on your home’s construction. Take your time here. The channel holds everything in place for 15 to 20 years, so it needs to be level and secure.
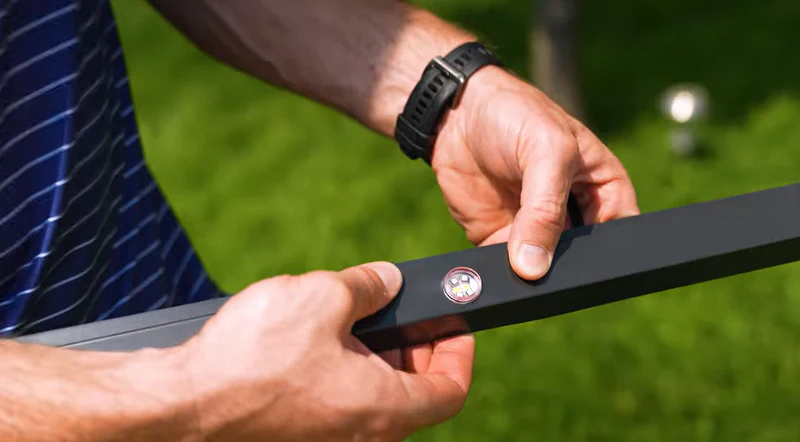
Click the Pixels Into the Channel
This is where the “Click” in ClickLights comes from. The LED pixel units snap directly into the mounted channel without screws or adhesive. Work from one end of the roofline to the other, keeping the strand’s directionality consistent throughout. Data flows one direction from the receiver through the pixel strand, so all connections need to follow that flow.
The strands can be cut at any point while unplugged to fit your exact roofline length. For gaps between lit sections (around a garage door, for example), Y-split connectors and unlit 3-wire create “jumps” that bridge the gap without wasting pixels. Seal any unused wire ends with end caps or electrical tape.
Connect the Power Supply and Bridge
The system requires a power supply point roughly every 75 feet along the roofline. If you have existing exterior outlets in the right locations, connecting the 24V power supply is straightforward. If you need new outlets added, that’s a separate job for a licensed electrician and should be done before you start the lighting installation.
The network bridge plugs into your router or modem with an Ethernet cable. A solid blue LED on the bridge means it’s connected and communicating properly. The wireless receiver mounts in your attic, soffit, or garage and talks to the bridge wirelessly, so it doesn’t need its own wired connection.
Important: Make all wiring connections with the system unpowered. The butt splice connectors need a heat gun to shrink into place, and all cable routing should be finished before anything gets plugged in.
Once the bridge is online, the EverLights app detects the system and walks you through the final configuration.
Test and Configure
Power on the system and open the app. You can test each zone, set colors, program schedules, and configure Alexa or Google Home integration. The system should be fully operational the same day you finish installation.
 Safety Notes
The CDC’s National Institute for Occupational Safety and Health reports that falls from ladders account for tens of thousands of injuries each year. OSHA recommends maintaining three points of contact at all times and setting the ladder at a 4-to-1 angle ratio. A few practical points:
- Work on a dry day with no wind
- Have someone at the base of the ladder
- Don’t overreach. Move the ladder instead
- Wear shoes with grip, not sandals or smooth soles
The upside of a permanent system is that this ladder work happens once. After installation, all changes happen through the app. No more November climbing to hang lights and no January climbing to take them down.
What if You Need Help?
EverLights has a U.S.-based support team available by phone and email if you get stuck. The DIY page also hosts video walkthroughs for measuring and installation.
If you get partway through and decide you’d prefer professional help, EverLights offers professional installation with a 5-year product warranty and 1-year labor warranty. The hardware is the same either way, so nothing goes to waste if you switch paths. For a full comparison, see the DIY vs. professional installation guide.